
There’s something undeniably comforting about a steaming, golden-crusted chicken pot pie-a dish that wraps you in warmth and nostalgia with every flaky bite. Yet, beneath its humble exterior lies a culinary art that can perplex even the most seasoned home cooks. Welcome to the Ultimate Guide to Mastering Classic Chicken Pot Pie, where tradition meets technique, and simplicity intertwines with sophistication. Whether you’re aiming for a buttery,flaky crust or a savory,creamy filling that bursts with tender chicken and vibrant vegetables,this guide will walk you thru every step,transforming a beloved comfort food into your signature masterpiece. Prepare to roll up your sleeves and embark on a tasty journey that celebrates the timeless allure of chicken pot pie in all its glory.
Selecting the Perfect Ingredients for a Rich and Comforting Filling
Mastering classic chicken pot pie begins with choosing each ingredient to build a filling that’s deeply satisfying and soulful. The foundation is fresh, tender chicken, ideally roasted or poached, which lends moistness and robust flavor. For vegetable balance, opt for a mix of carrots, peas, and celery-these colorful staples create vibrant texture contrasts and sweetness that complement the savory notes beautifully. Fresh herbs like thyme and parsley infuse an aromatic lift that sings through each bite.
The secret to a velvety filling lies in a perfectly crafted roux using unsalted butter and all-purpose flour, whisked patiently with a rich combination of chicken stock and a touch of half-and-half or whole milk for creaminess. Salt and freshly ground black pepper adjust seasoning to highlight natural flavors without overwhelming the palate. Avoid canned vegetables or pre-made mixes; from-scratch ingredients preserve that unmistakable homemade warmth.
Crafting the Flakiest Homemade Pie Crust from scratch
Nothing can match the irresistible appeal of a flaky, buttery crust bubbling with golden charm atop your pie. The process starts with thoughtfully cold unsalted butter cut into the flour to maintain little pockets of fat that melt during baking,creating those signature layers. Using ice-cold water carefully incorporated keeps the dough tender and easy to handle without clumping.
One of the keys is minimal overworking-mix just until the dough holds together, then chill for at least an hour. This rest period relaxes the gluten and solidifies the butter, resulting in a crust that’s crisp and light with every forkful. when rolling out, sprinkle your surface sparingly with flour, and aim for an even thickness around 1/8 inch to ensure balanced baking.
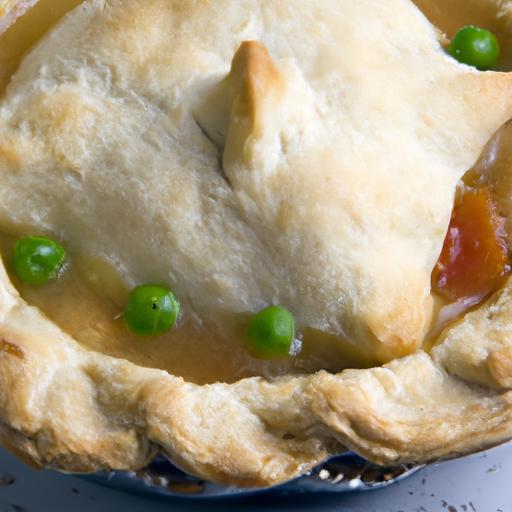
Mastering the Art of Layering and Assembling for Balanced Flavors
Assembly is where the magic converges. Start by gently spooning your luscious filling into a deep-dish pie plate,leaving a small border to prevent spillage. Next, carefully lay your rolled pie dough over the top, pressing edges lightly to seal and trimming excess for neatness.
Cut a few vents in the dough to invite steam escape and prevent sogginess. For a gleaming, golden finish, brush the crust lightly with an egg wash-a beaten egg mixed with a splash of water. This simple step lends a professional patisserie shine and enhances texture contrast against the velvety filling within.
Baking Tips and Troubleshooting for a Golden, Bubbling Pot Pie
Preheat your oven to 400°F (205°C) to ensure an even bake and a beautifully crisp crust. Place your pie on a rimmed baking sheet to catch any bubbling filling that might overflow-comfort food moments are meant to be luscious, not messy disasters.
Bake for about 35-45 minutes, watching carefully as the crust transforms to a warm golden brown. If the edges brown too quickly, shield them with foil mid-bake to prevent burning. Once done, allow your pot pie to rest for 10-15 minutes; this pause lets the filling thicken and settle, making slices clean and satisfying.
If you notice a watery filling, reduce some stock before assembling or thicken it slightly with a slurry of cornstarch and cold water. Patience and attention throughout each step ensure your classic chicken pot pie emerges as pure comfort on a plate.
Prep and Cook Time
- Prep Time: 30 minutes
- Cook Time: 45 minutes
- Total Time: 1 hour 15 minutes
Yield
- Servings: 6 generous slices
Difficulty Level
- Medium – requires some pastry handling and multi-step cooking
Ingredients
- 3 cups cooked chicken,shredded or diced
- 1 cup carrots,diced
- 1 cup frozen peas,thawed
- 1/2 cup celery,finely chopped
- 1/3 cup unsalted butter
- 1/3 cup all-purpose flour,sifted
- 2 cups chicken stock,warm
- 1/2 cup half-and-half or whole milk
- 1 teaspoon fresh thyme,chopped
- Salt and freshly ground black pepper to taste
- 1 egg,beaten with 1 tbsp water for egg wash
- Pie dough:
- 2 1/2 cups all-purpose flour,sifted
- 1 tsp salt
- 1 cup unsalted butter,chilled and cubed
- 6-8 tbsp ice-cold water
Instructions
- Prepare the filling: In a large skillet,melt unsalted butter over medium heat. Add diced carrots and celery; sauté until tender but slightly crisp, about 5 minutes, stirring occasionally to prevent sticking.
- Make the roux: Sprinkle the flour evenly over the vegetables and whisk constantly for 2 minutes to cook off raw flour taste while forming a paste.
- Add liquids: slowly pour in the warm chicken stock while whisking vigorously to prevent lumps. Stir in the half-and-half, and cook until thickened, about 3-4 minutes.
- Combine chicken and herbs: Fold the shredded chicken and peas into the sauce. Add thyme, and season with salt and pepper. Remove from heat and let cool slightly.
- Prepare the pie crust: In a large bowl, mix the flour and salt. Using a pastry cutter or fingertips, work in the chilled butter until mixture resembles coarse crumbs with pea-sized pieces.
- Add cold water: Drizzle ice-cold water one tablespoon at a time, tossing gently until the dough just comes together. Avoid over-mixing.
- Chill dough: Divide the dough into two discs, wrap in plastic wrap, and refrigerate for at least 1 hour.
- Roll out bottom crust: on a floured surface, roll one disc into a circle about 12 inches in diameter. Transfer to a 9-inch deep-dish pie plate, pressing gently into the corners.
- Fill pie: Spoon the cooled filling evenly into the crust.
- Top crust: Roll out the second dough disc to cover the filling. Carefully place it over the pie, trim edges, and crimp to seal. Cut 4-5 vents for steam.
- Apply egg wash: Brush the top crust with the beaten egg mixture for a glossy,golden finish.
- Bake: Place pie on a rimmed baking sheet and bake at 400°F (205°C) for 35-45 minutes, shielding edges with foil if browning too fast.
- Rest and serve: Allow the pie to rest 10-15 minutes before slicing to ensure a thickened filling and neat servings.
Chef’s Notes
- For extra richness, swap half of the half-and-half with heavy cream.
- Freeze any uncooked dough discs wrapped tightly for up to 2 months.
- Make ahead: Prepare filling a day in advance and refrigerate; assemble right before baking.
- Vegetarian option: Replace chicken with cubed potatoes and mushrooms, and substitute vegetable broth.
- To prevent a soggy crust bottom, bake on the lower rack and/or pre-bake the bottom crust for 5 minutes.
serving Suggestions
Serve slices alongside a crisp green salad dotted with cherry tomatoes and a zingy vinaigrette for refreshing contrast. Garnish with a sprinkle of fresh parsley or thyme for color and herbal brightness. A dollop of tangy crème fraîche or whole-grain mustard on the side enhances the cozy flavors. Pair with a light-bodied white wine like Chardonnay or a chilled pilsner for a balanced experience.
| Nutritional Info (per serving) | Calories | Protein (g) | Carbs (g) | Fat (g) |
|---|---|---|---|---|
| Classic Chicken Pot Pie | 420 | 32 | 32 | 18 |

For more comfort food inspiration, don’t miss our homemade chicken and dumplings recipe. Dive deeper into poultry cooking techniques at the serious Eats cooking guides.
Q&A
Q&A: The Ultimate Guide to Mastering Classic Chicken Pot Pie
Q1: what makes a classic chicken pot pie “classic”?
A1: A classic chicken pot pie is all about comfort and tradition-a buttery,flaky crust encasing a luscious filling of tender chicken,garden-fresh vegetables,and a creamy,savory sauce.Its timeless appeal lies in the perfect balance of textures and homestyle flavors that remind you of warm family dinners and cozy afternoons.
Q2: Can I use store-bought pie crust, or should I make it from scratch?
A2: While homemade pie crust takes the flavor and texture to heavenly heights with its flaky, melt-in-your-mouth layers, a high-quality store-bought crust can be a helpful shortcut, especially for beginners or busy cooks. If you do opt for homemade, aim for cold butter and minimal handling to ensure that signature flakiness.
Q3: What’s the key to a creamy and well-balanced filling?
A3: The magic lies in your roux-the flour and butter mixture that forms the thick base of the sauce. Cook it until it smells nutty and golden, then gradually whisk in chicken broth and cream or milk for a velvety finish. Season generously but thoughtfully,layering in thyme,parsley,salt,and pepper to elevate every bite.
Q4: Which vegetables work best in this pot pie?
A4: Classic combos often include diced carrots, peas, celery, and onions for color, texture, and flavor harmony. You can also introduce mushrooms, corn, or even potatoes for a twist. just be sure to slightly undercook harder veggies so they retain a subtle crunch after baking.
Q5: How do I prevent the crust from getting soggy?
A5: A few kitchen tricks help keep the crust crisp and golden:
- Pre-bake (blind bake) the bottom crust briefly to create a sturdy barrier.
- Chill the filled pie before baking to avoid runoff moisture seeping into the crust.
- Brush the inside of the crust with beaten egg or a thin layer of mustard for added moisture protection.
Q6: Is it better to bake the pie covered or uncovered?
A6: Baking uncovered allows the crust to brown beautifully and become irresistibly crispy. If the edges brown too fast, cover them with foil halfway through baking. An egg wash applied just before baking also enhances that golden, glossy finish you crave.
Q7: Can I make chicken pot pie ahead of time?
A7: Absolutely! Assemble the pie and refrigerate it for up to 24 hours before baking, which actually helps the flavors meld. You can also freeze it raw or fully baked-just thaw thoroughly before finishing in the oven to restore that freshly baked allure.
Q8: What are some creative twists I can try once I’ve mastered the classic?
A8: Once confident in the classic,experiment boldly! Consider swapping in turkey or ham,using puff pastry for a buttery lift,adding a spice kick with smoked paprika or cayenne,or sprinkling cheese on top for a crusty,savory crown. The pot pie canvas is yours to paint with flavor.
Q9: What’s the secret to carving the perfect slice?
A9: Let your pot pie rest for at least 10 minutes after baking. This pause lets the filling set up,making it easier to cut cleanly without runny spills. Use a sharp, sturdy knife and slice confidently-each piece should reveal that inviting mosaic of creamy filling and flaky crust.
Q10: Why is chicken pot pie such an enduring comfort food?
A10: Beyond its rich, filling ingredients, chicken pot pie is an edible hug-a nostalgic dish that warms both body and soul. Its blend of simplicity and sophistication connects us to home-cooked love, making it a perennial favorite for celebrations, chilly days, and moments when we simply need a reassuring taste of tradition.
Wrapping Up
As the aroma of golden, flaky crust mingles with the rich, savory filling of your perfectly crafted chicken pot pie, you’ll realize that mastering this classic comfort dish is more then just a recipe-it’s a culinary journey. Armed with these tips and techniques, you’re now ready to impress family and friends with a dish that’s timeless, heartwarming, and effortlessly satisfying. So go ahead, don your apron, gather your ingredients, and let each bite remind you why chicken pot pie isn’t just a meal-it’s a delicious tradition worth perfecting. Happy baking!