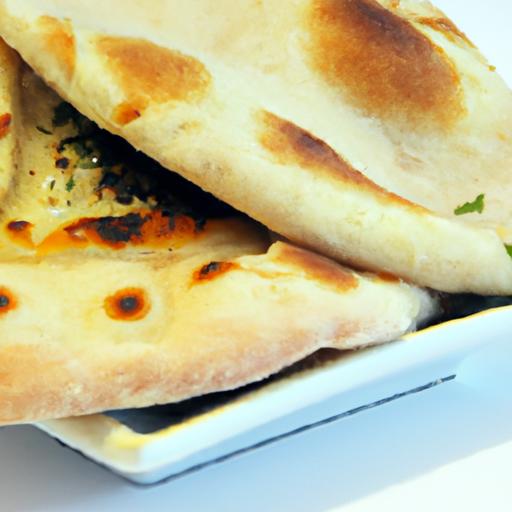

There’s something undeniably magical about biting into a warm, fluffy pita bread-the subtle crisp of its golden crust giving way too a pillowy, soft interior that’s perfect for scooping up hummus, wrapping around savory fillings, or simply enjoying fresh from the oven. While store-bought pitas can offer convenience, nothing quite compares to the satisfaction of crafting these pocket breads from scratch in your own kitchen.in this step-by-step guide,we’ll unfold the art and science behind perfect pita bread,revealing tips and tricks to help you achieve soft,rise-and-rise-again dough and those characteristic pockets that make pita truly special. Ready to roll up your sleeves and bake your way to pita perfection? let’s get started!
Choosing the Right Ingredients for Soft and Puffy Pitas
Perfect pita bread begins with selecting high-quality ingredients that set the foundation for its signature soft, pillowy texture and the iconic pocket. Use unbleached all-purpose flour or a blend of bread flour and all-purpose for optimal gluten growth, which is essential for that perfect puff. Fresh, active dry yeast or instant yeast will yield the best rise, while warm water-ideally between 105°F and 110°F-activates the yeast to work its magic without killing it.
In addition to flour and yeast, incorporating a touch of olive oil enriches the dough, offering a subtle flavor boost and tenderness. A pinch of salt balances the taste, and a bit of sugar feeds the yeast, ensuring a lively rise and slight golden crust. Avoid using cold water or expired yeast, as they can lead to dense, flat pitas.
Mastering the Dough: Techniques for Perfect texture and Flavor
Once your ingredients are gathered,the technique becomes the secret weapon.Begin by dissolving yeast and sugar in warm water and let it bloom until frothy-a sign your yeast is alive and thriving. Mixing your dry ingredients separately before combining them with wet ingredients ensures even distribution.
When kneading, aim for a smooth, elastic dough that springs back gently when poked. This usually takes about 8-10 minutes by hand or 5-7 minutes using a stand mixer fitted with a dough hook. Proper kneading develops gluten, which traps the air bubbles that expand and create the pocket during baking.
Afterward,allow your dough to rest and rise in a warm,draft-free spot until doubled in size,typically 1 to 1.5 hours. Folding the dough gently halfway through the rise can improve flavor and texture by redistributing yeast and air.
The Art of Shaping and Baking pita Bread to Achieve the Signature Pocket
Divide the risen dough into equal portions and gently shape each into smooth balls to maintain uniform puffing during baking. Roll each ball out evenly to about 1/4-inch thickness-too thin and they won’t puff; too thick and they may remain doughy inside.
Preheat your baking surface, be it a hot pizza stone or cast-iron skillet, to a high temperature (450°F to 500°F). The intense, even heat causes steam to rapidly build inside the dough, creating the characteristic pocket.
Place each rolled circle carefully onto the hot surface,baking for 2-3 minutes per side,until puffed and beautifully golden. Resist the urge to press down or overbake; the pocket forms naturally through heat and moisture.
Tips and Troubleshooting for Consistently Flawless Homemade Pitas
Humidity, flour type, and oven temperature can vary widely-here are some infallible tips to keep your pitas perfect:
- Humidity: If dough feels sticky, add flour a tablespoon at a time; if too dry, splash in more warm water.
- Oven heat: Ensure your baking surface is smoking hot before baking-this jumpstarts the puffing effect.
- Yeast activity: If dough does not rise well, test yeast freshness by proofing separately.
- Rolling technique: Roll gently and evenly to prevent holes and uneven cooking.
- Make-ahead: Dough can be refrigerated overnight; just bring to room temperature before shaping.
Prep and Cook Time
- Prep Time: 15 minutes
- Rise Time: 1 to 1.5 hours
- baking Time: 10-15 minutes total
Yield
Makes approximately 8 soft and puffy pita breads
Difficulty level
Medium-Requires some practice with dough handling and baking temperature management
Ingredients
- 3 cups unbleached all-purpose flour, sifted
- 1 cup warm water (105°F-110°F)
- 2 1/4 teaspoons active dry yeast (1 packet)
- 1 tablespoon sugar
- 2 tablespoons extra virgin olive oil
- 1 teaspoon fine sea salt
Instructions
- In a small bowl, combine warm water, sugar, and yeast. Stir gently and allow to sit for 5-10 minutes until frothy.
- In a large mixing bowl, whisk together flour and salt. Make a well in the center, then pour in the yeast mixture and olive oil.
- Mix with a wooden spoon or your hands until a shaggy dough forms. Transfer to a floured surface and knead for 8-10 minutes until smooth and elastic.
- place dough in a lightly oiled bowl, cover with a damp towel, and let rise in a warm spot for 1 to 1.5 hours, or until doubled in size.
- Once risen, punch down the dough gently and divide into 8 equal portions. Shape each into a smooth ball and cover loosely to rest for 10 minutes.
- Preheat your oven to 475°F and place a pizza stone or inverted baking sheet inside to heat for at least 30 minutes.
- On a lightly floured surface, roll each ball into a 6-7 inch circle about 1/4 inch thick.
- Carefully place each rolled pita onto the hot baking surface. Bake for 2-3 minutes until puffed and lightly golden, then flip and bake the other side another 1-2 minutes.
- Remove pitas from oven and wrap in a clean kitchen towel to keep soft as you bake the remaining pieces.
Chef’s Notes
- Flour variations: Substitute half all-purpose with whole wheat for nuttier flavor,but expect denser pitas.
- Yeast alternatives: Instant yeast can be added directly to dry ingredients; skip proofing step.
- Storage: Keep pitas warm in a cloth or refrigerate cooled pitas in a sealed bag.Reheat on a skillet for softness.
- Common issues: If pitas don’t puff, check oven heat and dough hydration; dough should neither be too dry nor too wet.
- Make-ahead tip: Dough can be refrigerated overnight for enhanced flavor complexity.
Serving Suggestions
These soft, fluffy pitas are perfect warm, fresh out of the oven. Slice to reveal the pocket, ideal for stuffing with grilled meats, roasted vegetables, or creamy spreads like hummus and tzatziki. Garnish with chopped herbs like parsley or cilantro for a vibrant finish. Pair with a fresh salad or drizzle pitas with garlic-infused olive oil before serving.
| Nutrient | Per Pita (approx.) |
|---|---|
| Calories | 150 kcal |
| Protein | 5 g |
| Carbohydrates | 30 g |
| Fat | 3 g |

Want to explore more Mediterranean baking techniques? Check out our Mediterranean Bread Recipes. For additional insights on yeast fermentation, visit King Arthur Baking’s Yeast Guide.
Q&A
Q: What makes pita bread “perfect”?
A: A perfect pita bread is a harmonious blend of soft,pillowy texture and that signature pocket that magically appears when it bakes. it’s golden, slightly chewy, with a tender crumb that’s just right for scooping, stuffing, or savoring on its own. Achieving this balance at home means mastering a few key techniques-like the right dough hydration and baking temperature-that we’ll walk you through step-by-step.
Q: Why should I make pita bread at home instead of buying it?
A: Homemade pita bread offers fresh warmth and unbeatable flavor that store-bought versions simply can’t match. Plus, making it yourself means no preservatives, full control over ingredients, and the joy of creating a versatile staple from scratch. It’s surprisingly simple, incredibly satisfying, and every pocket you pop open feels like a little victory.
Q: What ingredients are essential for perfect pita dough?
A: At its core, pita dough needs just four heroes: flour, yeast, water, and salt. Some recipes sneak in a touch of sugar or olive oil for added tenderness and flavor, but the classic quartet creates that elastic, pocket-forming dough that puffs up beautifully in the oven.
Q: How do I get that iconic pocket in pita bread?
A: The secret is steam! When you roll your dough balls thin and bake them on a very hot surface or stone, the water inside the dough instantly turns to steam. This steam inflates the dough from within, creating the hollow pocket. Proper rolling thickness and high temperature are your best friends for that perfect puff.
Q: What’s the best way to bake pita bread at home?
A: baking pita on a piping-hot pizza stone or cast-iron skillet in your oven sets the stage for fast,even heat that makes the dough puff up and brown just right. Preheat your oven as high as it goes (usually around 500°F/260°C),then slide the rolled dough onto your chosen surface. Bake for 2-3 minutes until golden spots and puffed bubbles appear. Instant magic!
Q: Can I make pita bread without a pizza stone?
A: Absolutely! While a pizza stone or cast-iron skillet is ideal for even heat, a heavy baking sheet flipped upside down can work in a pinch.The key is to preheat the surface well, so it mimics that hot, radiant heat that encourages the bread to puff.
Q: How should I store homemade pita bread to keep it fresh?
A: Once cooled, wrap your pita in a clean kitchen towel to keep them soft for a day or two. For longer storage, slip them into an airtight bag and freeze. When ready to enjoy, warm them briefly in a hot oven wrapped in foil or in a dry skillet to revive that fresh-baked softness.
Q: Any creative serving ideas for homemade pita?
A: The sky’s the limit! Stuff pita pockets with falafel, fresh veggies, and tahini for a classic Mediterranean treat. Cut into triangles for dipping in hummus or baba ganoush. Or toast slices for a crunchy base under avocado or spiced meats. Making pita bread at home lets you customize flavor, thickness, and pairings to your heart’s desire.
Q: What common mistakes should I avoid?
A: Avoid rolling your dough too thick or too thin-aim for about 1/4 inch (6 mm). Don’t skimp on oven heat; if the baking surface isn’t hot enough, your pitas won’t puff. Also, be patient letting the dough rise fully-it affects fluffiness and pocket formation. Last but not least, don’t skip resting the shaped dough briefly before baking; it helps relax the gluten for better puffing.Q: How long does the entire pita bread-making process take?
A: From mixing ingredients to baking, you’re looking at roughly 2 to 3 hours, including dough rising time. The active hands-on time is short-about 20-30 minutes-making pita an accessible and rewarding baking project even for beginners.
Ready to transform your kitchen with warm, perfect pockets of homemade pita? Let’s begin the appetizing journey, one rolling pin stroke at a time!
The Conclusion
With each warm, pocketed pita fresh from your oven, you’re not just making bread-you’re crafting a culinary canvas ready to be filled with endless flavors. This step-by-step guide has unraveled the simplicity behind perfect pita bread, turning a humble recipe into a homemade staple. Whether you’re stacking sandwiches, dipping into savory spreads, or just savoring the soft, fluffy layers on their own, mastering pita at home opens up a world of delicious possibilities. so roll up your sleeves, dust off your rolling pin, and let your kitchen be filled with the irresistible aroma of freshly baked pita-as sometimes, the best meals start with the perfect bread.