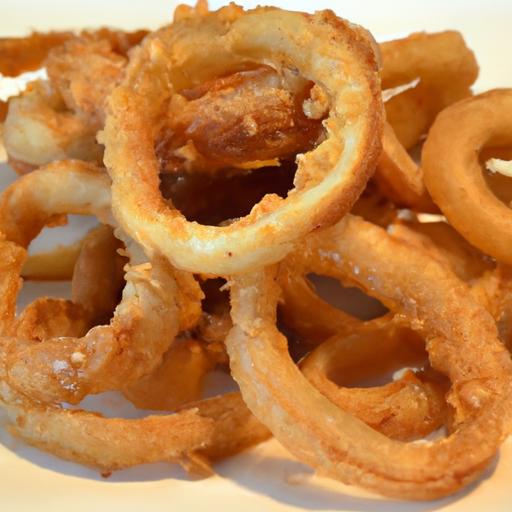
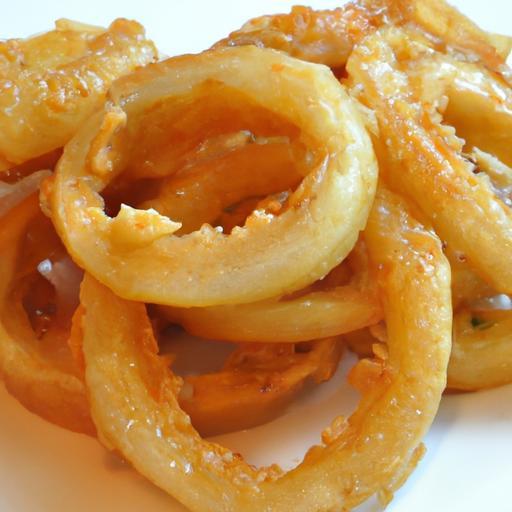
There’s something undeniably satisfying about biting into a perfectly crispy onion ring-the golden, crunchy exterior giving way to a sweet, tender onion inside. While these savory snacks are frequently enough relegated to fast food menus or restaurant sides, making them at home is easier than you might think. In this guide,we’ll dive into the art of crafting crispy homemade onion rings from scratch,exploring tips,techniques,and secret tricks to transform simple ingredients into a mouthwatering treat. Whether you’re a seasoned cook or a curious kitchen adventurer, get ready to elevate your snack game with this flavorful DIY favorite.
Crispy Homemade Onion Rings: Choosing the perfect Onions and Preparing Them for Maximum Crispiness
Crispy homemade onion rings embody the ultimate comfort snack, seamlessly marrying satisfying crunch with sweet, tender onion inside. The secret lies in selecting the right onions and preparing them to coax out their natural sweetness while ensuring every bite remains perfectly crisp. From the choice of onion to slicing technique, this guide reveals how to transform simple ingredients into golden, irresistible bites.
Prep and Cook Time
- readiness: 20 minutes
- Cooking: 15 minutes
- Total Time: 35 minutes
Yield
Serves 4 as a snack or appetizer
Difficulty Level
Easy to Medium – perfect for novice and experienced home cooks alike
Ingredients
- 2 large sweet onions (Vidalia or Walla Walla for mild sweetness)
- 1 cup all-purpose flour,sifted
- 1 teaspoon baking powder
- 1 teaspoon smoked paprika
- 1 teaspoon garlic powder
- ½ teaspoon salt
- 1 cup whole milk (room temperature)
- 1 large egg
- 1 cup panko breadcrumbs
- Vegetable oil for frying (about 4 cups)
- Optional: Fresh parsley for garnish,and dipping sauces like spicy aioli or classic ketchup
Instructions
- Choose and slice the onions: Peel the onions and slice them into ½-inch thick rings. Gently separate the rings, keeping them intact for coating. Larger rings work best for breathtaking crunch and presentation.
- Soak for sweetness and crispiness: Place the rings in a large bowl of ice water for 10 minutes. This step reduces sharpness and firms up the onions, preventing sogginess after frying.
- Prepare your batter: In a medium bowl, whisk together sifted flour, baking powder, smoked paprika, garlic powder, and salt. In a separate bowl, beat the egg with the milk. Slowly add the wet ingredients to the dry, whisking to a smooth, slightly thick batter-thicker batter clings better and creates crunch.
- preheat the oil: Fill a heavy-bottomed pot or deep fryer with at least 3 inches of vegetable oil. Heat to 350°F (175°C). Use a thermometer for accuracy; consistent heat is key to golden brown perfection.
- Batter and bread the onion rings: Drain the onion rings thoroughly. Dip each ring into the batter, letting excess drip off, then coat thoroughly with panko breadcrumbs. Press gently to ensure breadcrumbs adhere evenly.
- Fry in batches: Carefully add a few rings at a time to the hot oil. Avoid overcrowding, which lowers oil temperature and leads to greasy rings. Fry for 2-3 minutes per batch, turning once, until golden and crispy.
- Drain and crisp: Using a slotted spoon, transfer the cooked rings to a wire rack set over a baking sheet or paper towels to drain excess oil. This keeps them crispier longer than resting directly on absorbent paper.
- Serve promptly: Garnish with chopped parsley and pair with your favorite dipping sauces for an elevated tasting experience.
Tips for Success
- Onion choice matters: Sweet onions like Vidalia deliver a mellow flavor and caramelize slightly when fried, enhancing your Crispy Homemade Onion Rings experience.
- Maintain oil temperature: Use a thermometer and adjust heat between batches.Oil too hot burns the crust; too cool makes the batter soggy.
- batter consistency: Thicker batter helps adhesion but, if too thick, can overwhelm the onion. Aim for a creamy pourable texture.
- Panko breadcrumbs: Their coarse texture creates the satisfying crunch that defines the best onion rings.
- Make-ahead batter: Prepare batter in advance, but reserve coating and frying for immediate action to avoid sogginess.
- Experiment with spices: Add cayenne for heat or smoked sea salt for nuance to suit your palate.
- Internal Link: For an amazing twist, explore our Crispy Homemade Sweet Potato Fries recipe alongside these onion rings.
- External Resource: For detailed oil safety tips,visit FoodSafety.gov.
Serving Suggestions and Flavor Pairings to Elevate your Onion Rings
Present your golden onion rings stacked tall on a rustic wooden board or in a wire basket lined with parchment paper for that classic diner vibe.Accompany them with dipping sauces such as a smoky chipotle aioli, tangy buttermilk ranch, or a sweet-honey mustard.Freshly chopped parsley or chives not only add visual appeal but a fresh herbaceous note that balances richness.For a hearty snack, serve alongside sliders or gourmet burgers and a crisp, chilled beer or fresh lemonade.

| nutritional info (per serving) | Amount |
|---|---|
| Calories | 320 kcal |
| Protein | 6 g |
| Carbohydrates | 40 g |
| Fat | 14 g |
Q&A
Q&A: Crispy Homemade Onion Rings – A Delicious DIY Snack Guide
Q1: What makes homemade onion rings better than store-bought or fast-food versions?
A1: Homemade onion rings offer unbeatable freshness and control over ingredients, ensuring each ring is perfectly crispy, flavorful, and free from unwanted preservatives. Plus, you can customize the batter, seasoning, and cooking method to suit your taste buds-something store-bought or fast-food versions rarely allow!
Q2: Which type of onion works best for crispy onion rings?
A2: Sweet onions, like Vidalia or Walla Walla, are the stars of the show. Their mild, naturally sweet flavor contrasts beautifully with a crunchy, savory coating. Yellow onions are a good substitute when sweet onions are out of season, offering a more robust taste.
Q3: how can I ensure my onion rings come out extra crispy?
A3: The secret lies in the batter and frying technique! Use a cold, beer-based or buttermilk batter to create a light, airy crust. Double-dipping the onion rings-first in flour, then batter, then a light dusting of seasoned breadcrumbs-adds an irresistible crunch. Always fry in hot oil (around 350°F/175°C) for just a few minutes until golden.
Q4: Can I make onion rings ahead of time?
A4: Definitely! You can prepare the onion slices and keep them refrigerated for a few hours. However, for that crave-worthy crispness, it’s best to fry them fresh just before serving. If you need to make them ahead, fry them lightly, then re-fry or bake briefly before serving to revive their crunch.
Q5: What are some creative twists to elevate my homemade onion rings?
A5: Don’t be afraid to experiment! Mix spices like smoked paprika, cayenne, or garlic powder into your batter. Try dipping your rings in a tangy sriracha mayo or a zesty ranch dip. For a gourmet touch,add parmesan cheese to the batter or sprinkle fresh herbs like parsley over the finished rings.
Q6: Are there healthier ways to enjoy crispy onion rings?
A6: Yes! Rather of deep-frying, try baking your onion rings on a wire rack in the oven, or use an air fryer for a lighter crunch without sacrificing texture. Use whole wheat flour or panko breadcrumbs for added fiber, and consider dipping them in Greek yogurt-based sauces for a nutritious bonus.
Q7: Can onion rings be made gluten-free?
A7: Absolutely! Swap out regular flour for gluten-free all-purpose flour or chickpea flour in your batter. Use gluten-free breadcrumbs or crushed cornflakes for that crispy finish. With the right ingredients, gluten-free onion rings can be just as irresistibly crunchy and delicious.
Q8: What’s the best way to store leftover onion rings?
A8: Store them in an airtight container in the fridge, but keep in mind that onion rings tend to lose their crispness over time. To revive them,gently reheat in a preheated oven or air fryer rather than the microwave to regain that signature crunch.
Q9: Is it vital to soak the onions before battering?
A9: Soaking onion rings in ice-cold water for 30 minutes can mellow their sharpness and help them crisp up better when fried. this simple step adds a pleasant sweetness and reduces any overpowering pungency, making each bite perfectly balanced.
Q10: What equipment do I need to make crispy homemade onion rings?
A10: At minimum, you’ll need a sharp knife, a large bowl for battering, a frying pan or deep fryer, and a slotted spoon or spider strainer to safely remove the rings from hot oil. A wire rack is also helpful for draining excess oil and maintaining crispness.
Ready to turn an ordinary snack into a tantalizing homemade treat? With these tips and tricks, your kitchen will soon be filled with the irresistible aroma and crunch of perfect, crispy onion rings!
Closing Remarks
With their golden crunch and irresistible aroma, crispy homemade onion rings transform a simple snack into a flavorful festivity of texture and taste. Armed with this DIY guide, you’re now ready to turn everyday ingredients into a crispy delight that’s perfect for sharing-or savoring solo. So next time the craving hits,skip the drive-thru and dive into the satisfying art of crafting your own homemade onion rings. Your taste buds-and your kitchen-will thank you.