
There’s something undeniably magical about biting into a perfectly fluffy scone-the delicate crumb melting effortlessly on your tongue, the subtle buttery aroma wafting through the air, and that golden crust that offers just the right amount of crunch. Whether enjoyed plain, studded with juicy berries, or slathered with clotted cream and jam, scones hold a cherished place in the world of baked delights. But achieving that flawless fluffiness can feel elusive to even seasoned bakers. Fear not-this step-by-step baking guide will unravel the secrets behind creating scones that rise beautifully, stay tender, and satisfy your craving for a truly exquisite teatime treat. Get ready to elevate your baking skills and bring the joy of perfectly fluffy scones to your kitchen!
Perfectly fluffy scones start with understanding the magic behind key ingredients and mastering precise baking techniques that create that coveted,tender crumb. Rooted in traditional British teatime culture, scones evoke warmth and comfort, yet achieving that ideal airy texture can be a delightful challenge. As a passionate culinary content creator and food stylist, I’ve uncovered secrets to coaxing the most irresistibly soft and golden scones from your oven-each bite light, yet richly satisfying.
Prep and Cook Time
- Preparation: 20 minutes
- Baking: 15 minutes
- Total Time: 35 minutes
Yield
8 classic-sized scones
Difficulty Level
Easy - Perfect for beginners and seasoned bakers alike
Ingredients
- 2 ½ cups all-purpose flour, sifted
- 1 tablespoon baking powder, fresh and active
- 1/4 teaspoon baking soda
- 3 tablespoons granulated sugar
- 1/2 teaspoon fine sea salt
- 6 tablespoons unsalted butter, chilled and cubed
- 1 cup cold buttermilk (or whole milk with 1 tablespoon lemon juice)
- 1 large egg, lightly beaten (for brushing)
- Optional: 1/2 cup dried currants, blueberries, or chocolate chips
Instructions
- Preheat your oven to 425°F (220°C) and line a baking sheet with parchment paper for easy cleanup and even baking.
- Combine dry ingredients: In a large mixing bowl, whisk together the sifted flour, baking powder, baking soda, sugar, and salt-this ensures even distribution of leavening agents for a uniform rise.
- Cut in the chilled butter: Using a pastry cutter or your fingertips, work the butter into the flour until the mixture resembles coarse crumbs with pea-sized bits of butter still visible. This flaky texture is essential for fluffy scones.
- add mix-ins: If using dried fruit or chocolate chips, gently fold them into the flour-butter mixture now, keeping the butter bits intact for lift.
- Pour in cold buttermilk: Make a well in the center and pour in the buttermilk, stirring gently with a wooden spoon or spatula until a soft, sticky dough forms. Avoid overmixing to preserve tenderness.
- Shape the dough: Turn the dough onto a lightly floured surface and pat it into a 1-inch thick round. Use a sharp floured cutter to stamp out 8 rounds or cut into wedges with a knife for rustic charm. Pressing down too hard can squash your scones’ rise-be gentle.
- Brush with egg wash: Lightly brush the tops with beaten egg to encourage a golden, glossy finish.
- Bake: Place the scones on the prepared sheet and bake for 12-15 minutes until they are puffed, golden brown, and a toothpick inserted into the center comes out clean.
- Cool slightly: Allow scones to rest for 5 minutes on a wire rack before serving to set their delicate crumb.
Tips for Success
- Cold butter is non-negotiable. The secret to fluffy scones lies in solid butter creating tiny steam pockets as it melts during baking, which lifts and aerates the dough.
- Buttermilk’s acidity activates baking soda, providing a tender crumb with a subtle tang that complements the mild sweetness.
- Handle your dough gently. Overworking leads to tough scones. When mixing and shaping, less is more!
- Fresh baking powder ensures a strong rise. Test yours by whisking a teaspoon into warm water-it should bubble vigorously.
- For vegetarian or vegan variations, substitute butter with cold coconut oil and use plant-based milk with a splash of lemon juice for buttermilk.
- Make ahead: Freeze unbaked cut scones on a tray, then transfer to a bag. Bake from frozen, adding a few minutes to the baking time.
Serving Suggestions
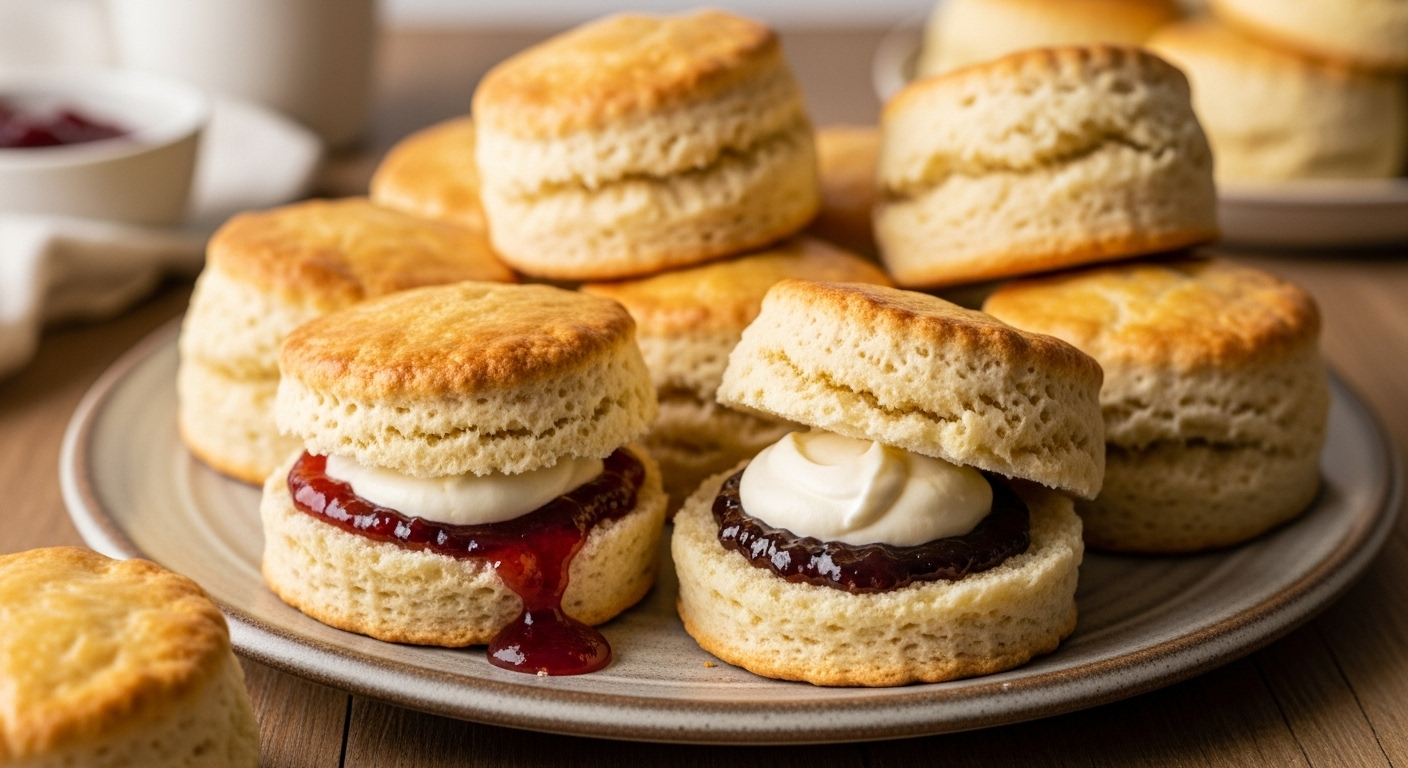
For a classic presentation,serve your scones warm alongside clotted cream and strawberry jam. Garnish with a sprig of fresh mint or a dusting of powdered sugar for an elegant touch. They are equally delightful paired with a drizzle of honey or a smear of lemon curd. Perfect for breakfast, brunch, or an afternoon tea party with a pot of rich Earl Gray.
| Nutrient | Per scone (Approx.) |
|---|---|
| Calories | 230 kcal |
| Protein | 4.5 g |
| Carbohydrates | 32 g |
| Fat | 8 g |
Ready to dive deeper into baking perfection? Explore our ultimate baking tips for beginners or discover more about the science of scone baking at King Arthur Baking.
Q&A
Q&A: Perfectly Fluffy Scones – Your Step-by-Step Baking Guide
Q1: What makes a scone perfectly fluffy?
A: The secret to a fluffy scone lies in gentle handling and the perfect balance of ingredients. Using cold butter cut into the flour creates little pockets of fat that melt during baking, resulting in a tender, flaky texture.Also, just the right amount of liquid and a light touch when mixing ensure the dough isn’t dense or overworked.
Q2: Can I use self-rising flour instead of all-purpose flour?
A: While self-rising flour can work, it’s best to stick with all-purpose flour and add your own leavening agents-baking powder and a pinch of baking soda. this way, you control the rise and texture, ensuring those delightful, airy layers that define a great scone.
Q3: How significant is the temperature of the ingredients?
A: Extremely important! Cold butter is essential for flaky scones, and using chilled milk or buttermilk helps the dough stay cool. Warm ingredients can cause the butter to melt too soon, leading to dense, heavy scones rather than fluffy ones.
Q4: What’s the best way to mix the dough without overworking it?
A: Use a fork or pastry cutter to incorporate butter into the flour until the mixture resembles coarse crumbs. Then add liquid and gently fold until just combined. The dough will be slightly shaggy-that’s perfect. Overmixing develops gluten which toughens the scones.
Q5: Should I shape scones by hand or use a cutter?
A: Both work beautifully-it’s about preference. Hand-shaping into a round and slicing into wedges can give a rustic charm, while a cutter ensures uniformity. Just make sure to press straight down without twisting to keep the edges light and neat.
Q6: How do I know when scones are perfectly baked?
A: Look for golden tops and slightly crisp edges. A toothpick inserted should come out clean. The scones should feel light and springy when gently pressed. baking times vary, but typically 12-15 minutes at around 400°F (200°C) hits the sweet spot.
Q7: Can I add flavors or mix-ins without sacrificing fluffiness?
A: Absolutely! Fold in berries, chocolate chips, or zest gently at the end of mixing. Just be careful not to overload the dough, which can weigh it down. Balance is key to keeping that lovely, airy texture intact.
Q8: Any tips for serving scones at their fluffiest?
A: Serve warm, ideally fresh from the oven. Slather with clotted cream and jam,or a drizzle of honey. If you must store them, wrap in foil and reheat briefly to revive that tender fluffiness. Scones are happiest when enjoyed with a cozy cup of tea!
With these insights, your journey to perfectly fluffy scones is ready to begin-happy baking!
Future Outlook
With these simple yet crucial steps tucked into your baking arsenal, achieving perfectly fluffy scones is no longer a delightful mystery but a repeatable reality.Remember, the magic lies not just in the ingredients, but in the gentle hands and mindful moments you invest. Whether enjoyed warm with a pat of butter or dolloped with jam and clotted cream, your scones will surely bring a comforting slice of bakery bliss to your kitchen. So roll up your sleeves, embrace the process, and let each batch be a crumbly celebration of your newfound baking prowess. Happy baking!